


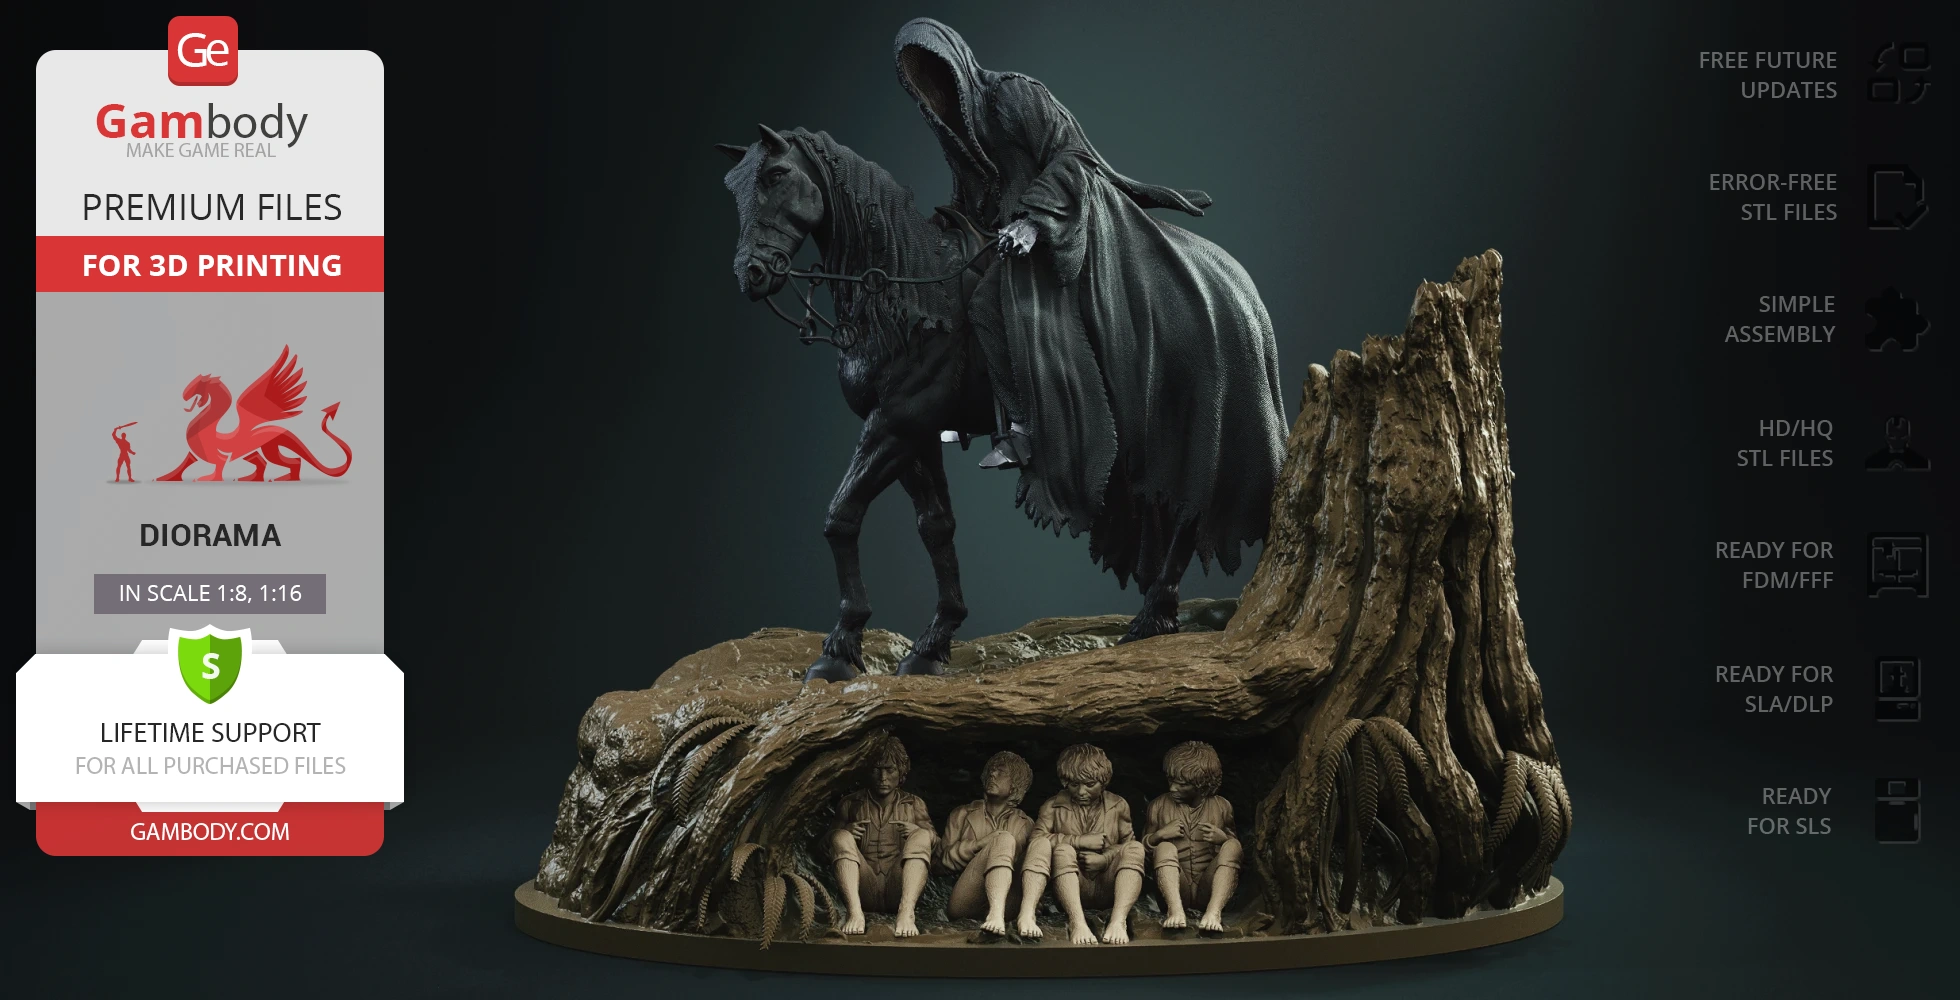
This should take overall.

This 3D printing design of Barad-dur consists of files in StereoLithography (.Stl) format that is optimized for 3D printing.
Before printing the files, we strongly recommend reading the PRINTING DETAILS section.
WHAT WILL YOU GET AFTER PURCHASE?
Detailed information about these 3D printer STL files is available in the DESCRIPTION section.

|
|||||
|---|---|---|---|---|---|
| File Name | File Size | Time / Filament | Object Size (x/y/z mm) |
||
|
_01_towerPart_a_V1_FDM ( repaired).stl |
26.55 MiB | 21 h 7 min 10 m | 108 x 97 x 141 | Download | |
|
_02_towerPart_a_V2_FDM ( repaired).stl |
25.62 MiB | 21 h 6 min 10 m | 108 x 97 x 141 | Download | |
|
_03_towerPart_b_FDM (rep aired).stl |
10.71 MiB | 32 h 34 min 14 m | 106 x 81 x 113 | Download | |
|
_04_towerPart_c_FDM (rep aired).stl |
21.91 MiB | 43 h 59 min 22 m | 106 x 106 x 144 | Download | |
|
_06_towerPart_e_FDM (rep aired).stl |
6.95 MiB | 6 h 1 min 3 m | 21 x 21 x 147 | Download | |
|
_07_towerPart_f_FDM (rep aired).stl |
6.92 MiB | 6 h 3 min 3 m | 21 x 21 x 148 | Download | |
|
_08_towerDecorPart_a_X3_F DM (repaired).stl |
0.17 MiB | 11 min <1 m | 22 x 14 x 12 | Download | |
|
_09_towerDecorPart_b_FDM (repaired).stl |
1.29 MiB | 2 h 41 min 1 m | 18 x 20 x 128 | Download | |
|
_10_towerDecorPart_c_FDM (repaired).stl |
0.76 MiB | 7 h 26 min 4 m | 36 x 24 x 133 | Download | |
|
_11_towerDecorPart_d_FDM (repaired).stl |
0.83 MiB | 3 h 43 min 2 m | 25 x 16 x 110 | Download | |
|
_12_towerDecorPart_e_FDM (repaired).stl |
0.20 MiB | 3 h 29 min 2 m | 21 x 25 x 117 | Download | |
|
_13_towerDecorPart_f_FDM (repaired).stl |
0.64 MiB | 8 h 5 min 5 m | 41 x 29 x 112 | Download | |
|
_14_towerDecorPart_g_FDM (repaired).stl |
0.38 MiB | 5 h 23 min 3 m | 23 x 29 x 140 | Download | |
|
_15_rockPart_1_FDM (repa ired).stl |
6.47 MiB | 138 h 20 min 83 m | 189 x 148 x 146 | Download | |
|
_16_rockPart_2_FDM (repa ired).stl |
8.31 MiB | 131 h 33 min 79 m | 208 x 157 x 146 | Download | |
|
_17_rockPart_3_FDM (repa ired).stl |
11.41 MiB | 184 h 38 min 109 m | 200 x 203 x 148 | Download | |
|
_18_rockPart_4_FDM (repa ired).stl |
10.64 MiB | 119 h 4 min 69 m | 156 x 158 x 159 | Download | |
|
_19_rockPart_5_FDM (repa ired).stl |
10.82 MiB | 54 h 37 min 32 m | 136 x 121 x 91 | Download | |
|
_20_rockPart_6_FDM (repa ired).stl |
10.58 MiB | 64 h 59 min 39 m | 152 x 169 x 90 | Download | |
|
_21_rockPart_7_FDM (repa ired).stl |
11.60 MiB | 86 h 39 min 51 m | 159 x 216 x 90 | Download | |
|
_22_rockPart_8_FDM (repa ired).stl |
16.47 MiB | 116 h 32 min 69 m | 150 x 214 x 93 | Download | |
|
_25_rockPart_11_FDM (rep aired).stl |
8.24 MiB | 83 h 3 min 49 m | 167 x 172 x 121 | Download | |
|
_26_rockPart_12_FDM (rep aired).stl |
12.70 MiB | 80 h 15 min 46 m | 155 x 138 x 128 | Download | |
|
_27_rockPart_13_FDM (rep aired).stl |
13.98 MiB | 106 h 32 min 62 m | 142 x 195 x 134 | Download | |
|
_28_rockPart_14_FDM (rep aired).stl |
10.06 MiB | 70 h 32 min 42 m | 123 x 155 x 146 | Download | |
|
_29_rockPart_15_FDM (rep aired).stl |
8.84 MiB | 108 h 20 min 64 m | 115 x 146 x 137 | Download | |
|
_30_rockPart_16_FDM (rep aired).stl |
0.45 MiB | 140 h 39 min 86 m | 216 x 152 x 146 | Download | |
|
_31_rockPart_17_FDM (rep aired).stl |
10.28 MiB | 132 h 52 min 80 m | 187 x 182 x 146 | Download | |
|
_32_rockPart_18_FDM (rep aired).stl |
9.71 MiB | 78 h 46 min 46 m | 169 x 200 x 146 | Download | |
|
_33_rockPart_19_FDM (rep aired).stl |
12.92 MiB | 72 h 4 min 40 m | 207 x 149 x 146 | Download | |
|
_34_rockPart_20_FDM (rep aired).stl |
16.53 MiB | 120 h 29 min 70 m | 218 x 165 x 146 | Download | |
|
_35_rockPart_21_FDM (rep aired).stl |
12.28 MiB | 129 h 4 min 76 m | 170 x 185 x 146 | Download | |
|
_36_rockPart_22_FDM (rep aired).stl |
17.09 MiB | 59 h 48 min 33 m | 156 x 213 x 143 | Download | |
|
_37_rockPart_23_FDM (rep aired).stl |
16.68 MiB | 160 h 39 min 96 m | 189 x 208 x 141 | Download | |
|
_38_rockPart_24_FDM (rep aired).stl |
6.38 MiB | 102 h 5 min 61 m | 187 x 122 x 141 | Download | |
|
_39_rockPart_25_FDM (rep aired).stl |
14.26 MiB | 151 h 52 min 90 m | 193 x 211 x 141 | Download | |
|
_40_rockPart_26_FDM (rep aired).stl |
11.53 MiB | 30 h 46 min 18 m | 103 x 161 x 94 | Download | |
|
_41_rockPart_27_FDM (rep aired).stl |
21.64 MiB | 104 h 12 min 58 m | 192 x 196 x 144 | Download | |
|
_42_rockPart_28_FDM (rep aired).stl |
17.23 MiB | 83 h 12 min 45 m | 170 x 149 x 143 | Download | |
|
_43_rockPart_29_FDM (rep aired).stl |
23.90 MiB | 112 h 51 min 64 m | 182 x 195 x 141 | Download | |
|
_44_rockPart_30_FDM (rep aired).stl |
19.18 MiB | 134 h 43 min 76 m | 258 x 149 x 110 | Download | |
|
_45_rockPart_31_FDM (rep aired).stl |
14.05 MiB | 131 h 9 min 73 m | 242 x 137 x 110 | Download | |
|
_46_rockPart_33_FDM (rep aired).stl |
11.63 MiB | 49 h 37 min 28 m | 153 x 126 x 105 | Download | |
|
_47_rockPart_34_FDM (rep aired).stl |
18.03 MiB | 91 h 18 min 53 m | 107 x 187 x 137 | Download | |
|
_48_rockPart_35_FDM (rep aired).stl |
12.14 MiB | 79 h 48 min 45 m | 119 x 178 x 137 | Download | |
|
_49_rockPart_36_FDM (rep aired).stl |
32.40 MiB | 81 h 38 min 42 m | 190 x 119 x 110 | Download | |
|
_50_bridge_a_X7_FDM (rep aired).stl |
0.38 MiB | 21 min <1 m | 7 x 8 x 35 | Download | |
|
_51_bridge_b_X2_FDM (rep aired).stl |
0.27 MiB | 16 min <1 m | 5 x 6 x 23 | Download | |
|
_52_bridge_c_FDM (repair ed).stl |
10.87 MiB | 1 h 50 min 1 m | 35 x 126 x 11 | Download | |
|
_53_bridge_d_FDM (repair ed).stl |
4.26 MiB | 53 min <1 m | 17 x 13 x 42 | Download | |
|
_54_bridgePart_a_FDM (re paired).stl |
8.20 MiB | 3 h 50 min 2 m | 24 x 22 x 109 | Download | |
|
_55_bridgePart_b_FDM (re paired).stl |
7.47 MiB | 2 h 41 min 1 m | 29 x 21 x 86 | Download | |
|
_56_magmaCap_a_FDM (repa ired).stl |
0.92 MiB | 5 h 10 min 3 m | 166 x 177 x 2 | Download | |
|
_57_magmaCap_b_FDM (repa ired).stl |
0.45 MiB | 5 h 29 min 3 m | 215 x 117 x 2 | Download | |
|
_58_magmaCap_c_FDM (repa ired).stl |
0.67 MiB | 5 h 10 min 3 m | 104 x 204 x 2 | Download | |
|
_60_magmaPart_b_FDM (rep aired).stl |
14.21 MiB | 13 h 48 min 9 m | 215 x 117 x 14 | Download | |
|
_61_magmaPart_c_FDM (rep aired).stl |
12.87 MiB | 12 h 10 min 8 m | 104 x 204 x 13 | Download | |
|
_62_rockCap_FDM (repaire d).stl |
0.43 MiB | 18 h 44 min 11 m | 194 x 192 x 8 | Download | |
|
_63_tower_a_FDM (repaire d).stl |
9.54 MiB | 15 h 45 min 8 m | 43 x 43 x 173 | Download | |
|
_64_tower_b_FDM (repaire d).stl |
7.68 MiB | 10 h 56 min 6 m | 42 x 42 x 138 | Download | |
|
_65_tower_c_FDM (repaire d).stl |
8.66 MiB | 9 h 31 min 5 m | 41 x 22 x 223 | Download | |
|
_66_tower_d_X8_FDM (repa ired).stl |
8.14 MiB | 7 h 52 min 4 m | 22 x 44 x 187 | Download | |
|
_67_tower_e_FDM (repaire d).stl |
6.89 MiB | 4 h 12 min 2 m | 23 x 22 x 125 | Download | |
|
_68_tower_f_FDM (repaire d).stl |
6.51 MiB | 4 h 8 min 2 m | 21 x 24 x 122 | Download | |
|
_69_tower_g_FDM (repaire d).stl |
6.67 MiB | 4 h 9 min 2 m | 24 x 23 x 124 | Download | |
|
_70_tower_h_FDM (repaire d).stl |
6.64 MiB | 3 h 55 min 2 m | 23 x 22 x 122 | Download | |
|
_71_tower_i_FDM (repaire d).stl |
6.89 MiB | 3 h 33 min 2 m | 23 x 22 x 115 | Download | |
|
_72_tower_j_FDM (repaire d).stl |
6.75 MiB | 3 h 36 min 2 m | 23 x 22 x 109 | Download | |
|
_73_tower_k_FDM (repaire d).stl |
6.29 MiB | 3 h 24 min 2 m | 23 x 23 x 115 | Download | |
|
_74_towerHead_a_X2_FDM ( repaired).stl |
5.12 MiB | 9 h 16 min 5 m | 38 x 38 x 112 | Download | |
|
_75_towerHead_b_X2_FDM ( repaired).stl |
7.34 MiB | 2 h 49 min 1 m | 26 x 26 x 71 | Download | |
|
_76_gate_a_FDM (repaired ).stl |
16.51 MiB | 5 h 17 min 3 m | 55 x 20 x 119 | Download | |
|
_77_gate_b_X2_FDM (repai red).stl |
5.74 MiB | 1 h 15 min <1 m | 18 x 10 x 84 | Download | |
|
_78_bodyPin_a_X51_FDM (r epaired).stl |
0.01 MiB | 1 h 7 min 1 m | 40 x 30 x 10 | Download | |
|
_79_bodyPin_b_X3_FDM (re paired).stl |
0.00 MiB | 30 min <1 m | 12 x 40 x 10 | Download | |
|
_80_bodyPin_c_X9_FDM (re paired).stl |
0.00 MiB | 20 min <1 m | 7 x 40 x 10 | Download | |
|
_81_eye_V1_FDM (repaired ).stl |
53.74 MiB | 4 h 30 min 2 m | 61 x 28 x 46 | Download | |
|
_82_eye_V2_FDM (repaired ).stl |
52.46 MiB | 4 h 31 min 2 m | 65 x 19 x 47 | Download | |
|
_83_eye_V3_FDM (repaired ).stl |
52.72 MiB | 4 h 31 min 2 m | 59 x 30 x 46 | Download | |
|
_84_eyeConnector_X2_FDM (repaired).stl |
0.53 MiB | 4 min <1 m | 4 x 4 x 15 | Download | |
|
Keychain (repaired).stl |
0.35 MiB | 23 min <1 m | 30 x 30 x 2 | Download | |
|
Tag (repaired).stl |
1.70 MiB | 1 h 18 min 1 m | 150 x 18 x 5 | Download | |
|
_23_rockPart_9_V1_FDM (re paired).stl |
18.75 MiB | 112 h 15 min 66 m | 148 x 216 x 100 | Download | |
|
_24_rockPart_10_FDM (repa ired).stl |
11.60 MiB | 75 h 46 min 45 m | 158 x 193 x 91 | Download | |
|
_59_magmaPart_a_V1_FDM (r epaired).stl |
13.94 MiB | 12 h 35 min 8 m | 165 x 176 x 14 | Download | |
|
_85_magmaPart_a_V2_FDM (r epaired).stl |
13.89 MiB | 12 h 31 min 8 m | 165 x 176 x 14 | Download | |
|
_86_rockPart_09_V2_FDM (r epaired).stl |
18.36 MiB | 109 h 56 min 64 m | 148 x 216 x 100 | Download | |
|
_87_magmaRiver_FDM (repai red).stl |
6.48 MiB | 17 h 42 min 15 m | 67 x 183 x 83 | Download | |
|
_05_towerPart_d_FDM (repa ired).stl |
32.03 MiB | 86 h 36 min 41 m | 142 x 123 x 180 | Download | |
| ... | |||||
This should take overall.
ABOUT THIS 3D MODEL
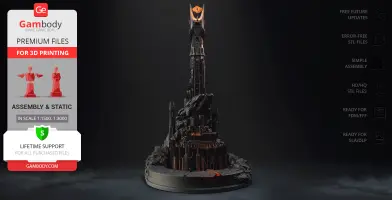
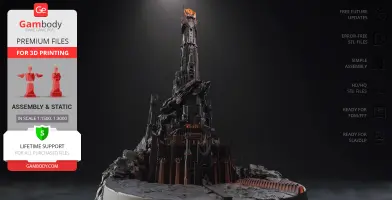
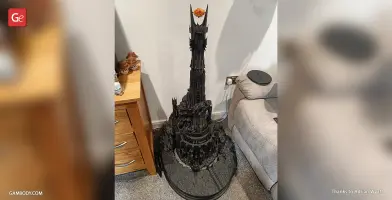
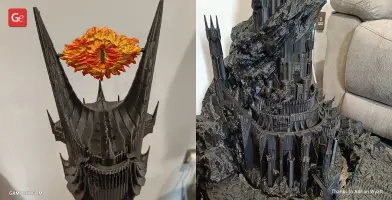
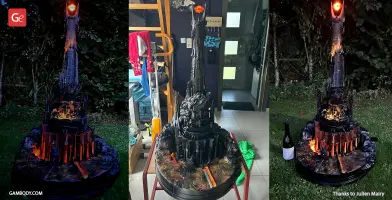
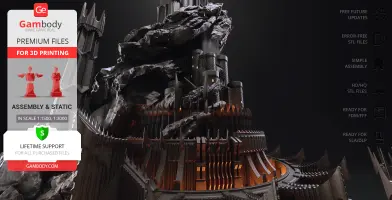
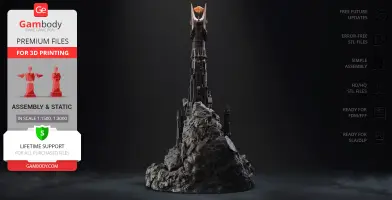
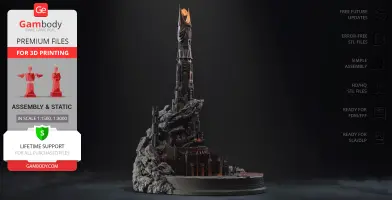
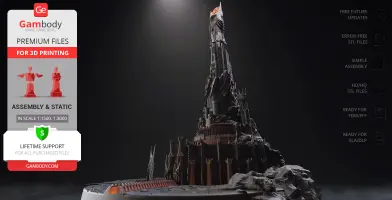
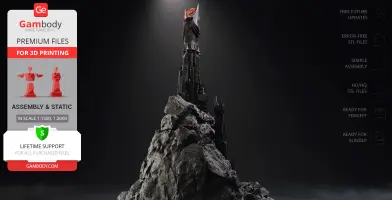
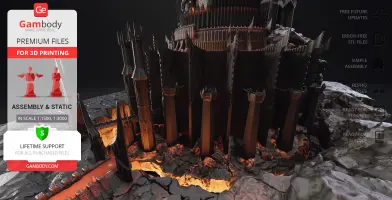
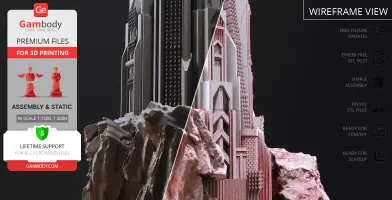
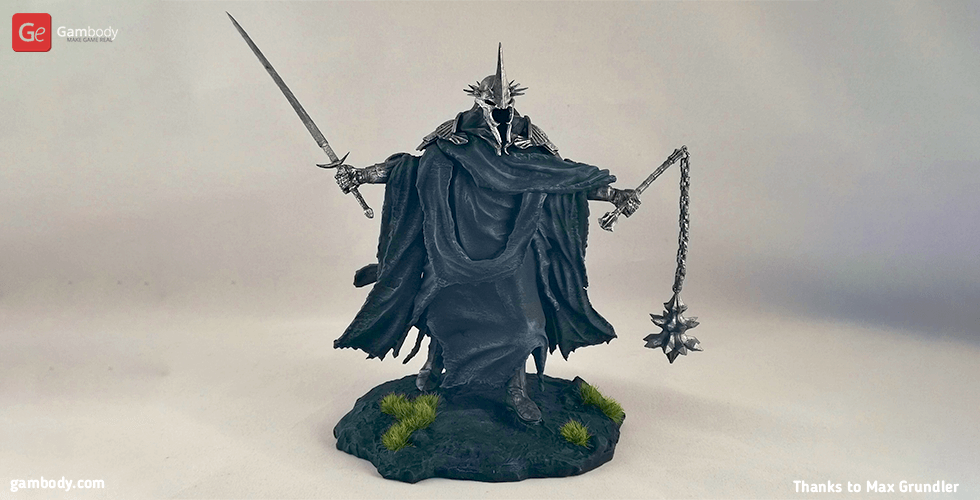
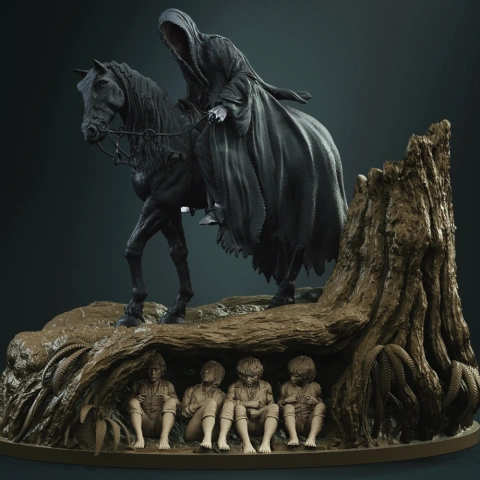
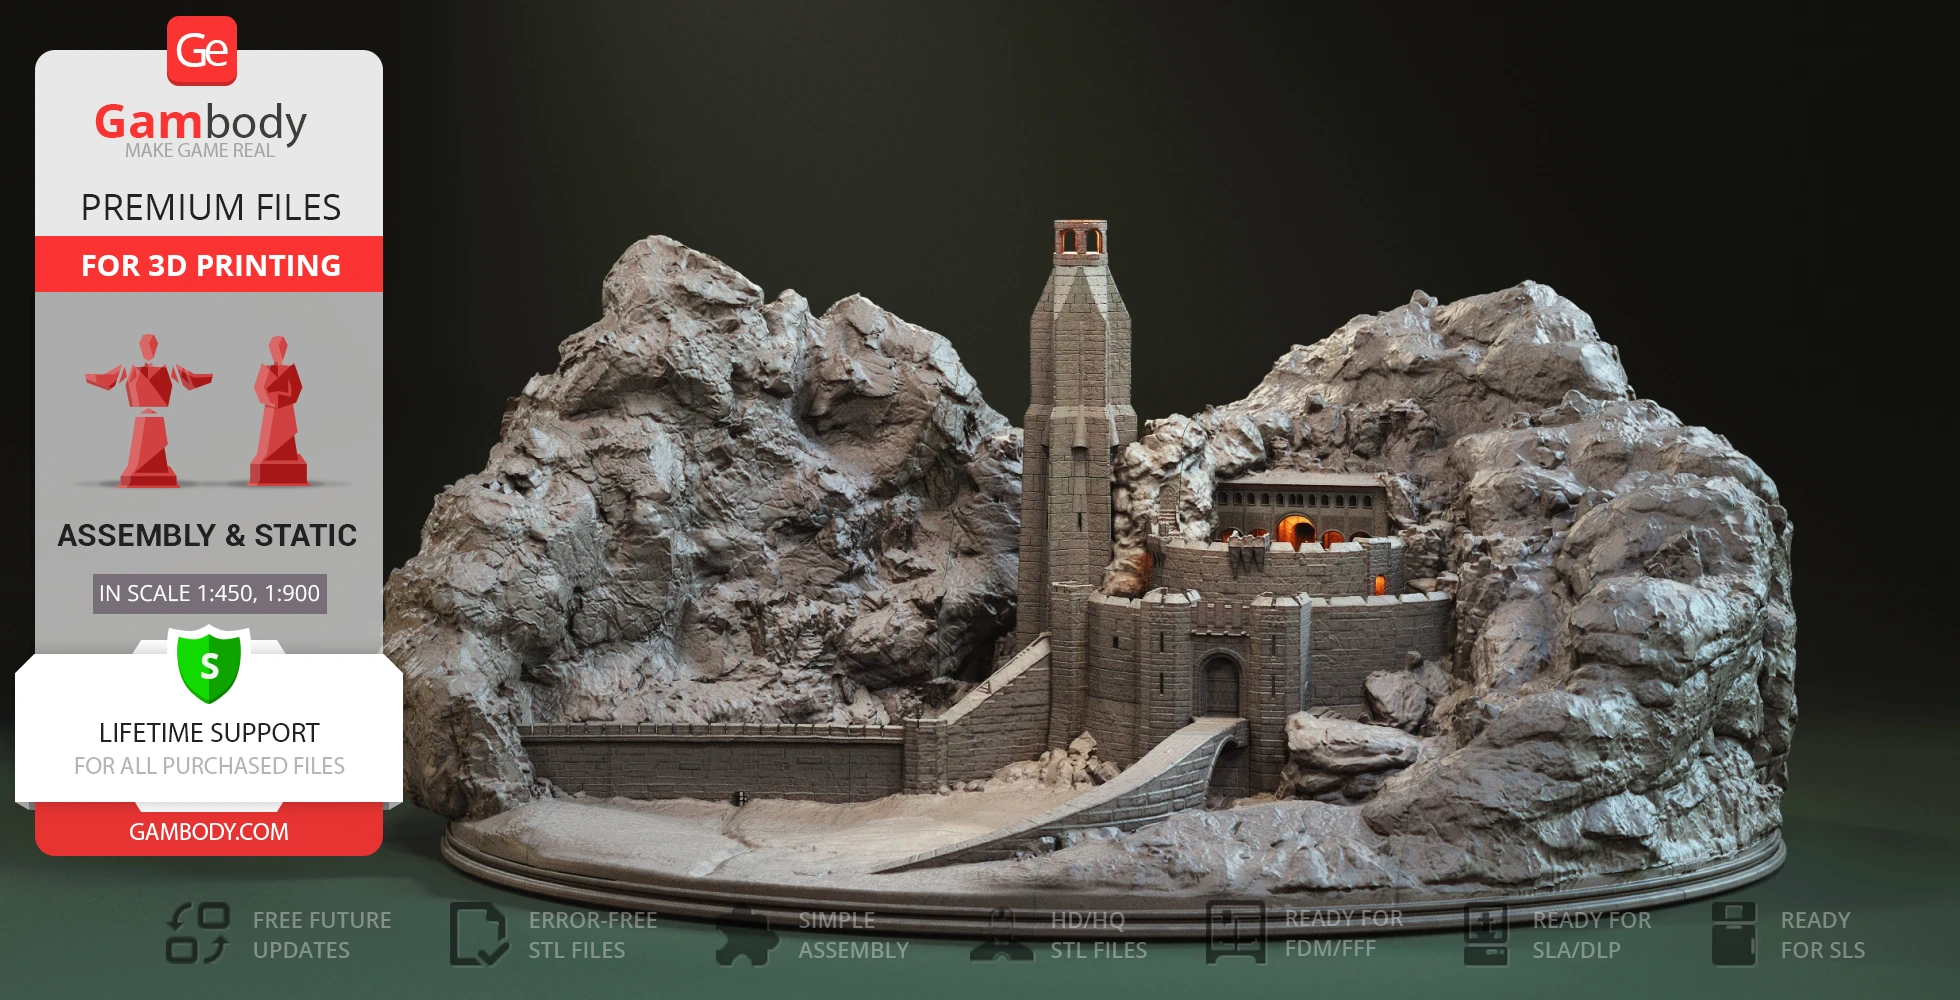
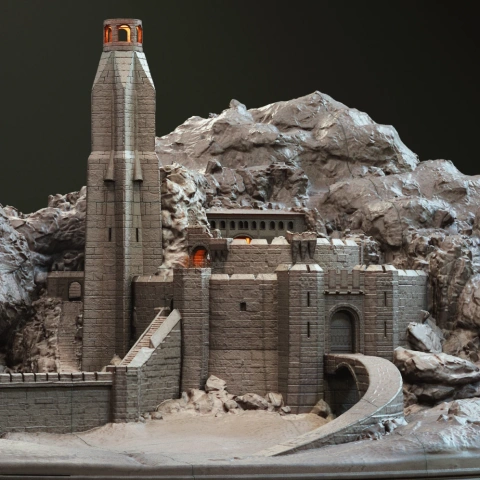
The maker of One Ring, Sauron, can be characterized as a merciless, aggressive, and wrathful character and his role in the LOTR saga is undoubtedly the leading one, considering it is Sauron who rules Mordor and strives to get possession of the whole Middle-earth using dark magic. Barad-dur fortress located in Northwestern Mordor and inhabited by Sauron, Nazgûl, and Mordor-orcs, is the capital of the dark empire of Mordor and the ruling seat of the Dark Emperor. The Dark Tower is often depicted as a massive building consisting of a spiraling gothic mass of towers and spires with a flaming Eye of Sauron on top of it. Barad-dur protected Sauron's domain from external threats, it served as a vantage point for surveillance within Mordor and beyond and was a major symbol of Sauron's power and tyranny.
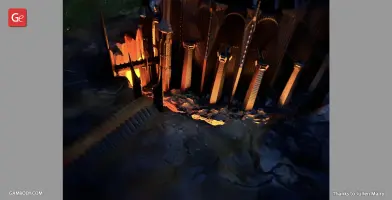
The long hours of meticulous work and great commitment to the idea allowed our contributing 3D artist to create the highly elaborate and artfully designed Barad-dur 3D printing design. The complexity of the construction of the tower, with its thought-out textures and engineering structures, is evident and the amount of individual constituents is very impressive: the tower consists of numerous smaller towers of different sizes and shapes, tiny windows and pointed spires, multipart gates, several bastions, bridge, and even the lava river. The huge cliffs criss-crossing the building are an integral part of the Barad-dur and the Great Eye on the top of the tower is another characteristic feature of the Dark Tower that makes it absolutely unique. 3D printing the Barad-dur model characterized by top-quality STL files and authentic design will bring you unparalleled emotions that you will never forget!
ADAPTATION FOR 3D PRINTING
The Barad-dur 3D printing design is a static assembly model and its moderation and adaptation for different types of 3D printers took the Gambody team 160 hours in total.
For you to receive the cleanest 3D printing result possible, minimize the amount of filament needed for generated support, and make use of the active elements designed by Gambody Engineers, the tower was divided into convenient assembly parts.
All assembly parts in the FFF/FDM 1.0 version are provided in STL files in recommended positions that were worked out in order to ensure the smoothness of the details’ surfaces after printing and that the 3D printing beginners won’t face difficulties when placing the parts on a build plate. When downloading any model’s file you will also receive “Assembly Manual” for FFF/FDM 1.0 and DLP/SLA 1.0 versions in PDF and video formats. We highly recommend that you get acquainted with the “Assembly Video” and “Assembly Manual” before getting down to the Barad-dur 3D printer model.
The model is saved in STL files, a format supported by most 3D printers. All STL files for 3D printing have been checked in Netfabb and no errors were shown.
The model’s scale was calculated from the height of the Barad-dur. The 3D printing design's chosen scales are 1:1500 for the FFF/FDM version and 1:3000 for the DLP/SLA version.
VERSIONS’ SPECIFICATIONS
FFF/FDM 1.0 version features:
DLP/SLA 1.0 version features:
You can get the STL files of Barad-dur 3D model immediately after the purchase! Just click the green Buy button in the top-right corner of the model’s page. You can pay with PayPal or your credit card.
Watch the tutorial on how to assemble a Barad-dur 3D Printer Model on Gambody YouTube channel.
Also, you may like other Lord of the Rings 3D Printing Designs.
________
FAQ:
Below you can find printing recommendations for Cura, Bambu Lab, Simplify3D, Slic3r and PrusaSlicer software.
Disclaimer: The following printing settings are a recommendation, not an obligation. The parameters can vary depending on the peculiarities of your 3D printer, the material you use, and especially the particular assembly part you are working with. Each part that any model comprises often needs preliminary review, and you are free to tweak the settings the way you find suitable.
Note:
You can scale up the model (downscaling for FFF/FDM 3D printers is not recommended!);
All connectors should be printed at 100% Infill.
These basic 3D printing settings recommendations for beginners were tested in Bambu Studio 1.9.1. Test models were printed on the Bambu Lab A1, Bambu Lab A1 Mini, Creality Ender 3 S1, Anycubic Kobra 2, and Anycubic Vyper using PLA and PETG filaments.
To avoid printing problems, we recommend the following settings: download
These are averaged settings which were tested in the Cura 5.2.1 slicer. Test models were printed on Anycubic Vyper, Creality Ender 3 Pro with PLA filament.
To avoid printing problems, we recommend the following settings: download
These are averaged settings which were tested in the Simplify3D 5.0.0 slicer. Test models were printed on Anycubic Vyper, FLSUN v400, Ender3 S1 with PLA filament.
To avoid printing problems, we recommend the following settings: download
These basic 3D printing settings recommendations for beginners were tested in Slic3r 1.3.0 software. Test models were printed on Ultimaker 2, Creality Ender 3, Creality Cr-10S pro v2, Anycubic I3 Mega, Anycubic I3 MegaS, Anycubic Vyper with PLA and PetG filaments.
To avoid printing problems, we recommend the following settings: download
These basic 3D printing settings recommendations for beginners were tested in PrusaSlicer 2.3.1. Test models were printed on Ultimaker 2, Creality Ender 3, Creality Cr-10S pro v2, Anycubic I3 Mega, Anycubic I3 MegaS, Anycubic Vyper with PLA and PETG filaments.
To avoid printing problems, we recommend the following settings: download
barad-dur, dark-fortress, mordor, middle-earth, dark-magic, j-r-r-tolkien, gandalf, mount-doom, aragorn, gollum, lord-of-the-rings, lotr, nazgul, frodo-baggins, destroyed, eye-of-sauron, gothic, bridge, lava, last-alliance, elves, stone, power, orcs, the-ring, the-return-of-the-king, mountain
You are about to report Barad-dur 3D Printer Files | Assembly for violating our Terms and Conditions. Please take a few moments to fill in the following information.


Comments